Toaster Oven to SMD Reflow Oven Conversion
Since I put up my kickstarter page, I have received a few emails asking about controlling a toaster oven using the laminator temperature control board. This is something I have been thinking about myself, so I decided to buy an oven and convert it into a SMD reflow oven. If you decide to do this, do it at your own risk and make sure you, your family, and your friends know to never use it for food!!!
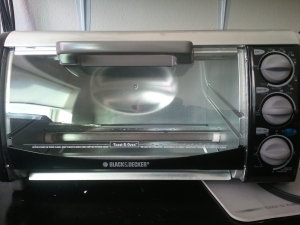
My only real criteria was that it had to be cheap. I bought one that was on sale at my local big box store (Fred Meyer in my case). The exact model shouldn’t matter because the cheap ones are all pretty much built the same. For those that want to know, I got a Black and Decker “Toast-R-Oven”. Here is what it looks like:
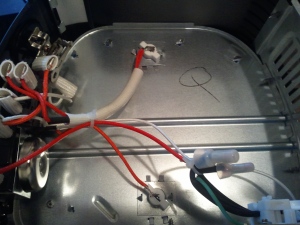
The first step was to take the side off and see what I was getting myself into. To take the cover off, I had to remove the feet from control side of the oven (right), and a couple of screws. A small annoyance was that the manufacturer decided to make one of the screws a Torx head (star driver). Once the screws were removed, the side panel opened on the bottom and lifted off. I needed to be careful because there are 2 metal tabs that hold the side panel in place on top and I didn’t want to bend them. With the side panel off, it was easy to see the wiring inside the toaster oven. Here is what it looks like:
The main power comes in on the lower right of the photo. The ground gets tied to the oven frame for safety. The neutral gets split with one side going to the power indicator on the front of the oven and the other going to the heating element return (lower right of photo behind the main power input). The incoming “live” wire goes to the power switch/timer/bell on the left side of the photo. The output of the switch gets split with one part going to the “live” side of the indicator light, and the remaining wire going to the Function (broil/toast/bake) select switch. That switch determines which of the heating elements will be active. This oven has one element on top and one on the bottom. The output of the function switch goes to the thermostat (top left of photo).
Since some experimentation is needed to get the reflow temperature dialed in just right, I decided it might be useful to have the function switch and timer/power switch still functional so I left them connected. The function switch will allow me to pick which heating elements get turned on. The timer/power switch will be nice to control the main power to the oven, while still having a stock easy to use interface. All that is needed is to bypass the thermostat so the control board is in charge of maintaining the correct temperature and then wire the control board in between the power switch and function select switch.
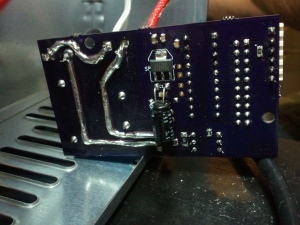
The toaster oven I’m using is rated for 1200W (10Amps at 120V). Since the control board was originally designed to control up to 6Amps, I needed to do a couple small mods to beef it up; switch in a higher power triac (the BTA06 for a BTA20) and solder wire to the power traces so they could carry the higher current. Here is what it looks like:
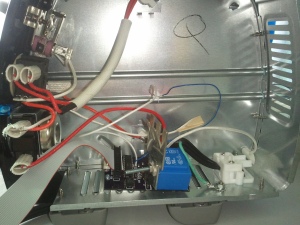
I’m not sure the exact current rating after the mod but 10 amps won’t be a problem. Next, I just need to wire in the controller and the toaster oven will have its new brain. For this trial run, the control board’s logic circuits are always powered, but the toaster ovens timer/power switch connects the triac to the heating elements for safety. I got lucky and the vents slats in the bottom of the oven were a perfect fit for the mounting holes I designed into the controller board. If this wasn’t the case, I could have easily drilled mounting holes in the toaster oven. Here’s another picture:
You can see the diode for measuring the temperature epoxied to the side of the oven(blue and white wires in the center of the picture). The diode isn’t rated for full use at the high temperatures needed for soldering, but will work great to show that controller works until I get the high temp thermistors I ordered. For now I will have to stay below about 150c.
I programmed the PIC microcontroller with the same code I used in the laminator, no changes were made. This means I have to use the display board to set the temperature, but for debugging this will be useful. In the next rev of the code, I plan to add a feature so that the temperature can simply be set with a potentiometer so the display board won’t be needed.
Using a “Kill A Watt” to help me monitor the ovens power consumption, I began testing the modifications. By default, the controller’s set point is 50F, so the oven should be off. The Kill A Watt confirmed this with a reading of about 2 watts (a little power for the controller and a whole lot of noise). Next, I adjusted the set point to a few degrees above room temp and the control board increased the power to the heating elements as expected (and confirmed by the Kill A Watt). When I adjust the set point to several degrees above the measured temperature, the control board applies full power (about 1100 watts). Once the measured temperature nears the set point, the control board throttles back the power to minimize overshoot.
If you are interested in getting a set of boards please take a look at my Kickstarter project.
Stay tuned for further updates but in the mean time enjoy this somewhat long video of it in action:


November 18, 2011 at 6:08 pm
cheap home appliance…
[…]Toaster Oven to SMD Reflow Oven Conversion « Karel's Electronic Projects[…]…
September 19, 2011 at 11:05 am
[…] and a heat gun is great. Heat guns aren’t the cheapest thing, so [Karel] decided to make cheap reflow oven out of a toaster oven. With a PCB taken from a laminator temperature control board, the build was […]
September 19, 2011 at 8:23 am
[…] and a heat gun is great. Heat guns aren’t the cheapest thing, so [Karel] decided to make cheap reflow oven out of a toaster oven. With a PCB taken from a laminator temperature control board, the build was […]
September 19, 2011 at 8:04 am
[…] and a heat gun is great. Heat guns aren’t the cheapest thing, so [Karel] decided to make cheap reflow oven out of a toaster oven. With a PCB taken from a laminator temperature control board, the build was […]